Have you ever looked at Otomi textiles and wondered how it has been made? Or do you just fancy making something by hand? If so then Kate has put together a Step by Step guide to Otomi hand embroidery. Have a go yourself, you won't regret it, it's very relaxing.
The pieces that we buy from Mexico are made in a women's cooperative in Tenangos, a village set high up in the mountains, right of Mexico City. Otomi embroidery was born out of financial difficulty as a new revenue stream following a dought which decimated crops in the Mexican State of Hidalgo back in the 1960's. It is a relatively new folk art, but one that captures so beautifully the joyous spirit of the women that work it and the communities they live in. Each piece is hand drawn and worked completely in the hand. Designs and colours vary, and as with many living traditions it is interesting to watch how this artform changes, regularly adopting new motifs and styles, reflecting closely the contemporary lives of each maker, yet staying completely identifiable. Larger pieces can take many months to finish and we hope that by having a go yourself you will understand the skill and dedication of the women behind this striking work.
If you are a beginner, you might like to practice the stitch on a piece of fabric only a little larger than the ring frame and filling in a simple design. Once mastered you can draw up a design on any scale and use as many colours as you like.
Step 1.
Materials and Equipment you will need.
- Calico.
- A wooden ring frame, 15cm/6” diameter is perfect.
- Any brand of stranded cottons in colours you like.
- A water erasable fabric marker. (Prym Aqua Trickmarker)
- An embroidery needle. (Nos. 9 embroidery is good)
- A sharp pair of embroidery scissors.

Step 2.
Using the water erasable fabric pen, draw your design onto the calico.
TIP – If you are a beginner, make sure that the shapes you draw are simple shapes that will be easy to fill with stitching. Wiggly edges are harder to fill. Take a look at some of our cushions and lampshades for inspiration.

Step 3.
Place the calico fabric into the ring frame.
TIP – Make sure that the fabric is drum tight in the frame as this will make it easier to make the stitches. The frame will be moved around the fabric as required to fill the design.

Step 4.
How to use the stranded cottons.
(Stranded cottons consist of 6 separate threads twisted together. Otomi embroidery is worked using only three of these strands) Individually separated the threads, place 3 together and thread the needle ready to stitch.

Step 5.
How to start a thread.
Tie a knot at the bottom of the thread. Within the shape that you are filling, place the needle into the calico (the knot will be on the top of the calico), make two tiny stitches near the knot, bring the needle up on the line of the shape and chop the knot off (under the knot itself) with the scissors.

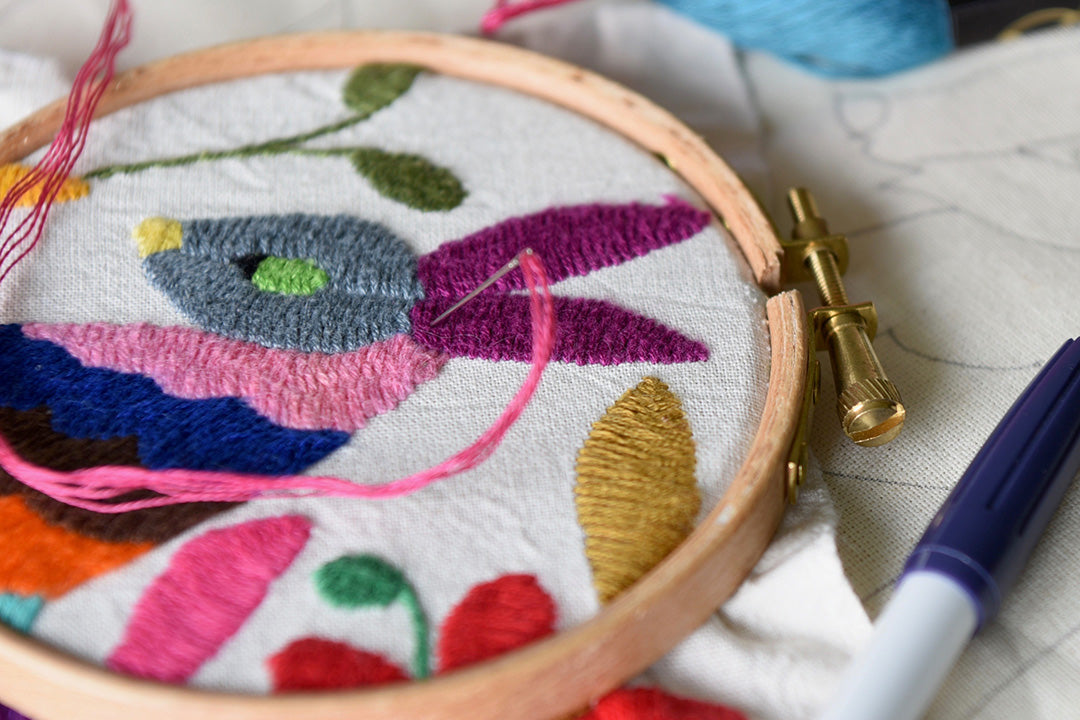
Step 6.
Otomi embroidery is worked using a closed herringbone stitch. To work the stitch think about each shape as having a left and a right side. If your thread is on the left side of the shape, as it is in this image, make a small stich on the right side of the shape paying attention to how the needle is placed in the image. (In essence, you will be making a sequence of little back stitches alternately on the left and right of the shape).

Step 7.
Take the needle back over to the left side of the shape and pick up a little backstich as before, then move to the right side and repeat.


Step 8.
Continue to move the needle from left to right of the shape, you will begin to see a pattern developing.

Step 9.
Finishing a thread.
Once a shape has been filled or if you are running out of thread and need to start a new one, make two tiny stitches nearby inside a shape that will be filled. Then, bring the thread up near the stitches and chop off the thread with a pair of scissors.


This is what the back of the stiching should look like. It is a line of tiny back stitches worked on each side of the shape.

Continue to fill the shapes with your chosen colours.

So this is how you do it, now just have a go, practice makes perfect....and remember Rome wasn't built in a day !